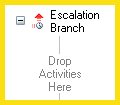
The Escalation activity contains two branches by default: a primary branch and an ![]() escalation branch. See the token the escalation branch produces.
escalation branch. See the token the escalation branch produces.
Note: When the primary branch has completed, no new escalation branches will begin, but all currently running escalation branches must complete for the workflow to continue. ![]() Show me an example.
Show me an example.
Tip: You can add escalation branches.
An escalation branch defines the routing criteria for an entry after a wait time is met. The activities contained in an escalation branch will only be performed if:
To configure an escalation branch
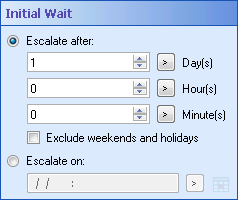
 to configure the amount of time (in days, hours, and/or minutes) before the escalation branch will run. Alternatively, click the token button (right arrow)
  to use tokens.
  to choose a date from a calendar. Alternatively, click the token button (right arrow) to use tokens.
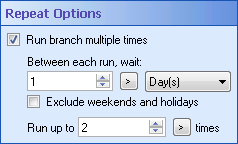
to configure the amount of time before the escalation branch will repeat. Alternatively, click the token button (right arrow) to use tokens. Note: The wait time between each repetition of an escalation branch starts after the escalation branch last finished. For example, an escalation branch contains an E-mail and a Wait Condition activity and is set to repeat after one hour. The branch will repeat one hour after the wait condition is met, not one hour after the escalation branch started.
to configure how many times the escalation branch will run if all currently running branches do not finish. Click the token button (right arrow) to use tokens.|
This documentation is specific to version 9.0. You can find the most up-to-date help files for the latest version at Current Online Laserfiche Product Help Files. For further help or feedback, please see the Laserfiche Support Site. |
© 2013 Laserfiche |